I've been printing increasingly larger models on my 3d printer, and I think I hit a limit. As some of you know, the amount of force required to 'peel' a slice of a model off of the bottom of a vat can require a tremendous amount of force. Unfortunately, it was too much for the vat, and the borosilicate glass bottom broke, showering resin all over my mirror, projector & electronics, ugh...
 |
| The Remains of the vat |
After a lengthy process of cleaning up spilled semi-hazardous resin, I began to plan on how to fix it. I located several EBay auction for borosilicate glass. Most of these auctions were selling panes of glass that act as a stable build surface for FDM printers.http://www.ebay.com/itm/Borosilicate-glass-for-RepRap-3D-printers-214mm-x-200mm-x-3-3mm-/321241665891?pt=LH_DefaultDomain_0&hash=item4acb7ed163
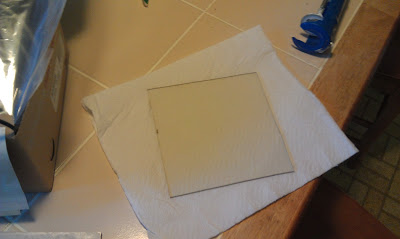
Borosilicate glass is used for it's optical transmission properties. Shown here is a few comparisons between several types of glass http://www.sinclairmfg.com/datasheets/optical3.html . Ultimately, I decided to take a chance. Instead of shelling out 25$ for a pane of glass, i decided to use a 5mm thick piece of polycarbonate plastic (Lexan) that I had laying around from another project.
Polycarbonate - aka - 'bulletproof glass' or 'Plexiglass' has fairly decent transmission properties. It does NOT transmit deep UV, but it looks like right around 390nm or so it starts.
Polycarbonate - aka - 'bulletproof glass' or 'Plexiglass' has fairly decent transmission properties. It does NOT transmit deep UV, but it looks like right around 390nm or so it starts.
 |
| Spectral transmission for polycarbonate |
 |
| Polycarbonate pane 155x155mm x ~5mm |
I knew that I was going to need a vat coating, I went ahead and ordered a few samples of FEP sheeting from CS Hyde http://catalog.cshyde.com/viewitems/films/fep-pfa-clear-ptfe-film?&bc=100|1002 . I ordered 1 sheet that was self-adhesive and 1 sheet that was not.
 |
| Taking a picture of sheet of plastic is difficult at best... |
 |
| The aluminum frame and walls all cleaned off, ready for a replacement |
I added in a generous amount on silicone sealant, and remounted the vat back on my machine. I was initially concerned that the plexi might block more UV light than the original, but after a few test prints, I was fairly convinced that there was no significant difference to the optical UV transmission for the lamp I was using.
 |
| All back in working order |
One new feature I added to my printer was a peristaltic pump (http://en.wikipedia.org/wiki/Peristaltic_pump) that I ordered from China. It was originally intended as a small aquarium medication pump. At first I was wondering how I was going to control this feature through Creation Workshop. Should I add a motor driver section? Should I have the controls automated? What G-Code could control this? In the end, I realized that I was completely over-thinking this, and I added a simple DPDT (double pole - double throw) switch connected to a 5v power supply. This allows me to control the direction of the pump.
I drilled 2 holes in the cap for the resin. The tube went through one hole in the cap, and the other hole is used for venting. I used a small fuel-line hose that I bought from an auto-parts store to extend the short hose of the pump. I also used a few short segments of brass tubing to connect the various hose lengths together, and to act as weights for the end of the hoses. I did a few tests with some water and a few glasses to verify that the pumping system was working properly. The flow rate was good, no leaks, everything looks like a go!
I mounted the peristaltic pump system in my printer. I used the word 'mounted' a little loosely here. It's actually just wired into the power supply and placed in the area that I want it. I did a few tests pump resin in and out of the vat and back into the bottle. It looks like everything is working well. Now I don't have to detach my vat to drain it, or use a syringe or funnel to get the resin back in resin container. In the next day or so, I'll probably FDM print a mount plate for the switch and pump and zip-tie a few cables.
The only thing I would change about this set-up is using BLACK tubing. I'm concerned about light curing leftover resin in the tube. Instead of changing everything, I may either spray-paint the tube, or wrap some tape around it to block out light.
 |
| I can use the fill/drain tube to add/remove resin from the vat |
I would HIGHLY recommend getting a cheap peristaltic pump, a length of tubing and a switch to make your own system.
-Steve


Enjoyed reading.
ReplyDeleteI'm going with a bottom up, cuz I'm mainly interested in creating small extremely fragile items. I'm also exploring doing something like the Peachy printer where the resin floats on a heavier liquid thus eliminating the need for storing a large volume of resin.
This is such a cool project.
ReplyDelete