Pages

Thursday, November 14, 2013

Creation Workshop Version 13 - Last BETA release

This is probably the quickest turn-around I've had between releases. Version 13 doesn't have anything earth-shattering in it, but it does have the following:
  • Fixed all reported issues in version 12
  • Improved Camera Controls (Thanks Shai!)
  • Huge reduction in memory usage
  • Instant Slicing
  • Volume & Cost Estimator
  • Revised future-proof config files
  • Additional support generation tools
  • Fixed the intersection issues in support generation & object selection
  • Simplified GUI (G-Code controls)
  • New Plug-In System
  • Other things I forgot...

Now that I look at the list, this release actually does have quite a bit to offer. You can download version Beta 13 from the usual spot here: https://github.com/Pacmanfan/UVDLPSlicerController/tree/master/UVDLP/Published

Sunday, November 3, 2013

One Step Back, 2 Steps Forward

      So, I've been doing a lot of printing on my 3d UV DLP printer lately, making little tweaks here and there. A few months ago, my friend Tristram Budel http://3dprinterplans.info/tag/tristram-budel/ was kind enough to send me one of his high-quality machined build vats. The frame of it is machine from a solid piece of aluminum, and he uses (I believe) FEP sheets to coat the vat bottom. He also uses a thin piece of borosilicate glass http://en.wikipedia.org/wiki/Borosilicate_glass

      I've been printing increasingly larger models on my 3d printer, and I think I hit a limit. As some of you know, the amount of force required to 'peel' a slice of a model off of the bottom of a vat can require a tremendous amount of force. Unfortunately, it was too much for the vat, and the borosilicate glass bottom broke, showering resin all over my mirror, projector & electronics, ugh...

The Remains of the vat
      After a lengthy process of cleaning up spilled semi-hazardous resin, I began to plan on how to fix it. I located several EBay auction for borosilicate glass. Most of these auctions were selling panes of glass that act as a stable build surface for FDM printers.http://www.ebay.com/itm/Borosilicate-glass-for-RepRap-3D-printers-214mm-x-200mm-x-3-3mm-/321241665891?pt=LH_DefaultDomain_0&hash=item4acb7ed163

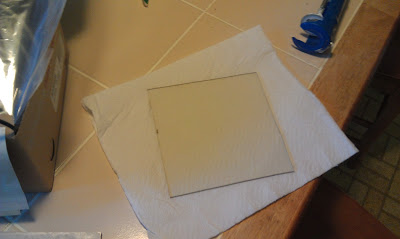
      Borosilicate glass is used for it's optical transmission properties. Shown here is a few comparisons between several types of glass http://www.sinclairmfg.com/datasheets/optical3.html . Ultimately, I decided to take a chance. Instead of shelling out 25$ for a pane of glass, i decided to use a 5mm thick piece of polycarbonate plastic (Lexan)  that I had laying around from another project.

Polycarbonate - aka - 'bulletproof glass' or 'Plexiglass' has fairly decent transmission properties. It does NOT transmit deep UV, but it looks like right around 390nm or so it starts.
Spectral transmission for polycarbonate

Polycarbonate pane 155x155mm x ~5mm

      I knew that I was going to need a vat coating, I went ahead and ordered a few samples of FEP sheeting from CS Hyde http://catalog.cshyde.com/viewitems/films/fep-pfa-clear-ptfe-film?&bc=100|1002 . I ordered 1 sheet that was self-adhesive and 1 sheet that was not.
Taking a picture of  sheet of plastic is difficult at best...
The aluminum frame and walls all cleaned off, ready for a replacement
      I replaced the broken borosilicate glass with the plexiglass pane. I decided to use the FEP sheet that had the self-adhesive and I immediately regretted the decision. As soon as I peeled the FEP from the backing, it curled up and stuck to itself. It took a little doing to get the FEP properly placed on the plexi, and even then I was plagued by bubbles. Of course AFTER the fact, I did a little research on how to properly put down adhesive-back sheets (stickers, window tinting, etc...), so maybe next time, I'll have a little better luck, or use the non-adhesive version.

      I added in a generous amount on silicone sealant, and remounted the vat back on my machine. I was initially concerned that the plexi might block more UV light than the original, but after a few test prints, I was fairly convinced that there was no significant difference to the optical UV transmission for the lamp I was using.

All back in working order

     One new feature I added to my printer was a peristaltic pump (http://en.wikipedia.org/wiki/Peristaltic_pump) that I ordered from China. It was originally intended as a small aquarium medication pump. At first I was wondering how I was going to control this feature through Creation Workshop. Should I add a motor driver section? Should I have the controls automated? What G-Code could control this? In the end, I realized that I was completely over-thinking this, and I added a simple DPDT (double pole - double throw) switch connected to a 5v power supply. This allows me to control the direction of the pump. 


      I drilled 2 holes in the cap for the resin. The tube went through one hole in the cap, and the other hole is used for venting. I used a small fuel-line hose that I bought from an auto-parts store to extend the short hose of the pump. I also used a few short segments of brass tubing to connect the various hose lengths together, and to act as weights for the end of the hoses.  I did a few tests with some water and a few glasses to verify that the pumping system was working properly. The flow rate was good, no leaks, everything looks like a go!


     I mounted the peristaltic pump system in my printer. I used the word 'mounted' a little loosely here. It's actually just wired into the power supply and placed in the area that I want it. I did a few tests pump resin in and out of the vat and back into the bottle. It looks like everything is working well. Now I don't have to detach my vat to drain it, or use a syringe or funnel to get the resin back in resin container. In the next day or so, I'll probably FDM print a mount plate for the switch and pump and zip-tie a few cables.
The only thing I would change about this set-up is using BLACK tubing. I'm concerned about light curing leftover resin in the tube. Instead of changing everything, I may either spray-paint the tube, or wrap some tape around it to block out light.
I can use the fill/drain tube to add/remove resin from the vat

I would HIGHLY recommend getting a cheap peristaltic pump, a length of tubing and a switch to make your own system.

More to come later.
-Steve


Saturday, November 2, 2013

UV DLP Pico Projector Experiments Part 1

      I briefly mentioned in one of my last posts about ordering and receiving a pico projector to experiment with. I obtained a re-furbished  AAXA P2JR directly from their webite http://www.aaxatech.com/products/p2jr_pico_projector.html  . 

The victim
      It came with the usual accessories, power adapter, micro-VGA to VGA adapter, composite cables, etc... My intent in ordering this is to see if I can adapt it for use in a bottom-up (or top-down) UV DLP 3d printer. I was a little nervous for several reasons. Normally, I don't just purchase new pieces of technology for the sole purpose of ripping them apart, but I figured I needed to break a few eggs to make an omelet.
       I was hoping that this projector would 'just work' and be able to cure resin without any modifications, but I pretty much figured it was going to need some mods. After powering it up, connecting it to my computer, and projecting silly images across my walls, cats, and girlfriend, I decided to get down to business. I ran my latest development code of 'Creation Workshop', sliced up a model, and chose a nice slice to test with.

Initial resin test
      I put a few drops of UV resin in a plastic sandwich bag, laid it flat, and projected an image slice. It went pretty much how I figured. After about 30 seconds, I checked the bag, and to my disappoint (but not surprise) I saw that it had failed to cure the resin in the slightest. 

      Now, I have it on good source that at least one person in the community has been able to modify a pico-projector for UV DLP purposes, so I wasn't ready to give up yet. I began to prep the patient for surgery.
Back cover off


The green and blue cable goes to the DLP unit's LEDs


A flat ribbon cable connects the DLP to the main board

     I was kinda nervous taking this all apart. What if I break it? What if I nick off a resistor? Am I about to lose 169$ bucks? Well, I hit my stride, and decided to make some progress in the name of science. I was able to completely dis-assemble the projector into it's essential components, the case, the speaker, the battery, the main board, and the DLP unit which was attached to a hefty heat sink.

I gently lifted the little bar that held down the ribbon cable to remove the DLP. After freeing the DLP from the main board, I had a better chance to examine the actual DLP projector without fear of tearing the ribbon cable.

Note the blue/green wires, L-bracket and copper heatsink

Initially, I was a little puzzled by the 2 sets of 4 wires. 

A good view of the optic-path

At the bottom/left of the picture, you can see the L-Bracket, each side has a 4-wire lead. Light is being projected in from 2 sides - each at a 90 degree angle from each other. Notice the funny-looking bluish glass (it's important later).

I figured that the L-Bracket contained the LEDs, and that I was probably going to have to replace them with a better UV source. I carefully sliced through the black rubbery epoxy holding the LED L-Bracket to the side of the DLP Unit.

The removed Led bracket 

I examined the LED L-bracket and noted that 1 led was marked R/B and the second was marked G. Without getting TOO much in theory about how DLP projectors work, I wanted to make a few comparisons between Color-wheel types and LED types.

In a Color-wheel type of DLP projector, a light source is projected through a spinning color wheel. The wheel has an encoder mechanism that tells the control electronics which color the light is currently projecting through. The appropriate color mask is displayed on the DLP micro-mirror array.

In a LED-type projector, either 1, 2, or 3 LEDs are used. Since LEDs can quickly turn on/off, the control electronics will turn on a single color, the DLP chip will display the appropriate mask-image for that color, and the process is repeated for all colors.


An image I found that explains the optic path 
The above image is NOT a picture of my DLP device, but serves to show the portions of the optic path. My optic path is a little different, but has very similar elements. 

Light from LEDs shine through collumnating optics. Dichroic mirrors (http://en.wikipedia.org/wiki/Dichroic_filter) reflect a specific frequency of light through a fish-eye lens, reflect on a right angle, then pass through the DLP portion and out the projection lens.

I knew that the dichroic mirrors were going to be a problem. They only allows a very narrow bandwidth of light through. 

I went ahead and took out the dichroic mirror reflectors and replaced it with a single FSM (Front surface mirror). This essentially blocked off 1 light path, which was alright, because I'm only going to use 1 light path for a UV led.

I've got a bit more to say about this and a few more results, but I'm going to save it for part 2.
Stay tuned.
-Steve