Pages

Showing posts with label z axis. Show all posts

Thursday, March 7, 2013

Resin tray rebuild and UV Resin testing.

Last week, I purchased some UV resin specifically designed for 3d printing from 3DInk http://buy3dink.com/p/59/uv-resin . It arrived yesterday and I immediately started conducting a few print tests. One of the first things I noticed is that the resin was much less viscous than the SolarEZ resin I tried before. The 3DInk resin flowed almost like water. Again, I put a few drops in a sandwich bag and placed it on my resin tray.

I fired up my software and picked a nice slice from the 'Goldberg Sphere'. The resin cured within seconds! Good progress so far. The next step was to test the adhesion (or hopefully lack of adhesion) to my polycarbonate resin build tray. I used a silicone spray and paper towel to grease up my build tray, and I place a small amount (few drops) of resin on the tray to be exposed.
The remains of my first build tray.

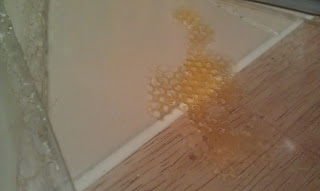
Unfortunately, The resin firmly adhered to the build tray. No amount of coaxing could remove it. I decided polycarbonate might not be the best choice, or I might have to use a thin film of Teflon coating on the polycarbonate. Either way, this build tray was toast. 

Shown here is the resin stuck to the tray.


I found a nice small pane of soda glass I had been saving, and re-tried with a few more drops on an un-coated pane. Even un-coated, the resin did not adhere very well to the glass. I was able to slide a few test prints off the pane.

Some test object slices of the 'Goldberg Sphere'

New build tray

I used some aluminum channel stock I had lying around along with the glass pane to construct a new build tray of the proper size. I used silicone sealant on all bottom edges and the corners to ensure a proper watertight seal.


I think this new build tray will do the trick. The last thing I need to do is finish the arm that connects to the ZAxis and dips into the resin. I've already added a leveling system to the bottom of the build tray on the printer. I may have to add a small leveling system (some screws) to the build arm.


Tuesday, February 19, 2013

UV Printer getting closer to completion


I spent quite a few hours this past weekend working both on my 3D UV DLP printer, as well as the control software for it. I took the time to take a bunch of pictures. This is going to be a picture-heavy post, so please bare with me.
In this pic, I'm attaching the z-axis arm to the top of the printer. I've cut a hole to allow for the DLP projector to shine light on the bottom of the plastic build tray.

Here's a picture of how it's attacked. I used 4x 5mm bolts to secure the z-axis and prevent any wobble.

Shown here is the attached Z-Axis with the build tray in place.

I have the projector mounted at a fixed location on the interior of the printer cabinet.


I remembered that I had a 4 axis CNC stepper motor controller board along with an Arduino Mega 2650 that I had used in another project. I plan on recycling some of it as a controller.

After debating what I should use as a power supply, I settled on using a power supply from an Arcade Cabinet (Yes, that one...http://probjectblogs.blogspot.com/2009/04/heres-donor-tv.html). It's a 5v 11amp and 12 V 4amp power supply. More than enough to power an Arduino and NEMA 23 motor.

I wanted an integrated 1-push power system, so I dug through my spare parts box and found a 3 prong power receptacle as well as a push on/off mains switch.
I quickly designed and printed a plate for the rear of the machine to hold the switch and power receptacle.


Shown here is the mounted power supply wired to the back plate and the DLP Projector. Now, one push can turn on the entire system.

Sunday, January 13, 2013

Some Progress this weekend

I didn't get as much done on my project this weekend as I had hoped. I did manage to print and attach some handles to the cabinet I built. I also put together the polycarbonate build tray with some plastic glue. Hopefully this will be a suitable tray for build. I still have a pane of glass that can be used if the UV resin sticks to the polycarbonate plastic too much. I also started the assembly of z-axis that I printed from my Thingiverse "Generic 23 printed axis" object http://www.thingiverse.com/thing:37123 .

The Z axis being assembled
The completed polycarbonate build tray


Friday, January 11, 2013

More DLP Printer progress.

I made a case for my DLP printer. 3/4 inch MDF. With a walnut top. Also shown are a bag of the printer parts for the z axis. Additionally, I cut some polycarbonate plastic for the UV resin tank. Tomorrow, I put it all together.  We'll see what happens.